How To’s Day: Pleated Sash Triangle Pillow
October 8th, 2013 by admin
Hi everyone!
Today is another How To’s Day! We’ve got another fantastic project for you. Today we share with you how to make your very own pleated sash triangle pillows. Sounds adorable, right? They most definitely are!

In the Gray & Yellow triangle pillow, we used Imaginarium’s 2140403 #3, Gray Elephants, for the Body, and 2140407 #3 Yellow Ditsy Twigs, for the Sash. In the Pink & White triangle pillow, we used 2140405 #1, White Monkeys, for the Body and 2140407 #1 Pink White Twigs, for the Sash.
Pillows are one of the easiest ways to change up and transform any area, and with these, you can mix and match as you please! Spruce up your living space with a group of these darling, unique triangle pillows. Everyone will be asking where you bought them from. Now, let’s get sewing!!
Click to see the full tutorial after the jump.
Pleated Sash Triangle Pillow Tutorial
Supplies & Tools:
– 1 1/4 yard of 44″ quilting cotton in Body color
– 1/2 yard of 44″ quilting cotton in Sash color
– One 8″ zipper in coordinating color
– One bag of fiber stuffing
– 24″ straight edge/ruler
– Basic sewing supplies: sewing machine, iron, pressing surface & spray bottle, coordinating thread, straight pins, fabric shears, measuring tape, and fabric marker
*Finished dimensions: 22″ wide x 16″ tall x 6″ deep
(Note: Please wash, dry, and press your fabric before starting. Unless otherwise stated, all seams are 1/2″ wide)
Instructions
Knife-Pleated Sash:
1. Cut a rectangle 20″ wide x 16″ tall from your accent fabric. Hem one long edge at 1/2″ – this will be the top edge of your Sash – and the other long edge at 1″ for the bottom of the Sash. Leave the short ends rough and press your hems.

2. With its right side facing up, measure a scant 2″ from the bottom of the Sash along one short edge. Fold this point down to 1/2″ from the bottom edge of the sash as shown to create your first knife pleat. Pin in place, inserting the pin perpendicular to the fabric’s short edge.
3. Repeat Step 2 for 4 more pleats, but measure each pleat from the bottom of the previous one instead of from the bottom edge of the fabric
4. Repeat Steps 2-3 along the second short edge of the fabric
5. Baste your pleats in place with a 3/8″ seam allowance. Sew from the top of the Sash toward the bottom, so your machine’s foot smooths the pleats down as they pass under the needle
6. Press your pleats one at a time, starting with the bottom pleat. Spritz your fabric with the spray bottle before pressing each pleat to help set the crease.
Triangle Pillow Body:
1. Cut a rectangle 25″ wide and 19″ tall from your Body fabric and mark a point at the center of the top long edge. Use your straight edge to draw a triangle with its top corner at this point and its bottom two corners at the bottom corners of your piece of fabric.
2. Repeat Step 1 for the second Body piece.
Installing a Zipper:

1. Place your zipper against the bottom edge of one Body piece with the fabric’s Wrong Side up. Mark the beginning and end of the zipper’s teeth on your Body’s piece.
2. Sew the bottom edges of the Body pieces together, Right Sides facing, but leave a gap between the two marks you made for the zipper. Backstitch at each end and press the seam open along the full length of the pieces.

3. With the Right Sides up, open your Body pieces and fit the zipper into the gap you left with its toggle end to the left. Pin the zipper’s tape on the near side to the folded edge of fabric so the fold almost touches the center of the zipper. In the diagram the gap is shown slightly open and the edge of the zipper’s tape is outlined to show you how everything is arranged, but in reality the zip is underneath the Body’s pieces and your gap should be almost closed.
4. Mount your machine’s zipper foot on the left side of the pressing arm as directed by your user’s manual.
5. With the zipper open a couple of inches, sew from the top of the pinned zipper tape, as close to the zipper teeth as you comfortably can, until you reach the toggle. Put the needle in the fabric to hold it still, lift your machine’s foot and close the zipper. Lower your machine’s foot and finish your seam down the left side of the zipper, backstitching at the end.

6. Pin the second side of the zipper tape to the remaining folded edge of fabric, placing one pin at the closed end of the zip as shown.
7. Sew across the closed end of the zipper, going back and forth once to secure the seam, then put the needle into the fabric, lift your machine’s foot and rotate the work to begin the second side of the zipper. Put the foot down and sew until you reach the zipper’s toggle. Put in the needle, lift the foot and unzip a few inches, then put the foot down and sew to the top of the zipper. Rotate your work once again and sew across the top as you did for the bottom.
Assembly:
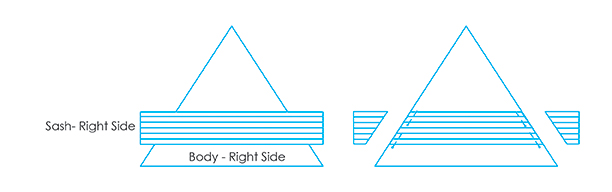
1. With right sides facing up, position the Sash parallel to the bottom side of one Body piece, about 4″ from the triangle’s edge. Pin well and trim the short edges of the Sash so they’re flush with the Body’s edge.
2. Baste the Sash in place with a 3/8″ seam. Once again, sew from the top of the sash toward the bottom.
3. With the Right Sides together, sew around the two sides of the pillow, beginning at the bottom right corner and backstitching at both ends of the seam. When you reach the top corner, put in your needle, rotate the work as you did when sewing the zipper and continue down the left side to finish closing the pillow.

4. Trim your corners as shown and press your seams open.
5. Turn your pillow right side out through the open zipper, making sure your sash is sitting on the correct side of the triangle with its finished face exposed, and poke out the corners with a pencil.
6. Stuff your pillow, zip it up, and relax!
And now you should have the most adorable pillow (or two!) completed, ready to dress up any room! We really hope you enjoyed this week’s tutorial.
Be sure to come back every Tuesday for a new How To’s Day post. If you decide to give this project a try, be sure to tweet us a picture or email us at info@camelotfabrics.com – we love hearing from you! :)
Happy Sewing!
ps: Our first blog giveaway is still running until this Wednesday. Enter to win a Dream a Little Dream FQB here!
September 18, 2014 at 7:22 pm, Jackie said:
My niece would love this pillow. She lost so much in a recent fire. This is a great pattern and I think it will brightened up her day. Must get started this weekend. Thanks.