How To’s Day: Play Date Quilt by Tamarinis
November 10th, 2015 by Camelot Fabrics
Hi everyone,
Happy Tuesday! I hope you all are having a marvelous day! It’s the last day to enter our Make a Wish Giveaway, so be sure to head on over to our Facebook Page!
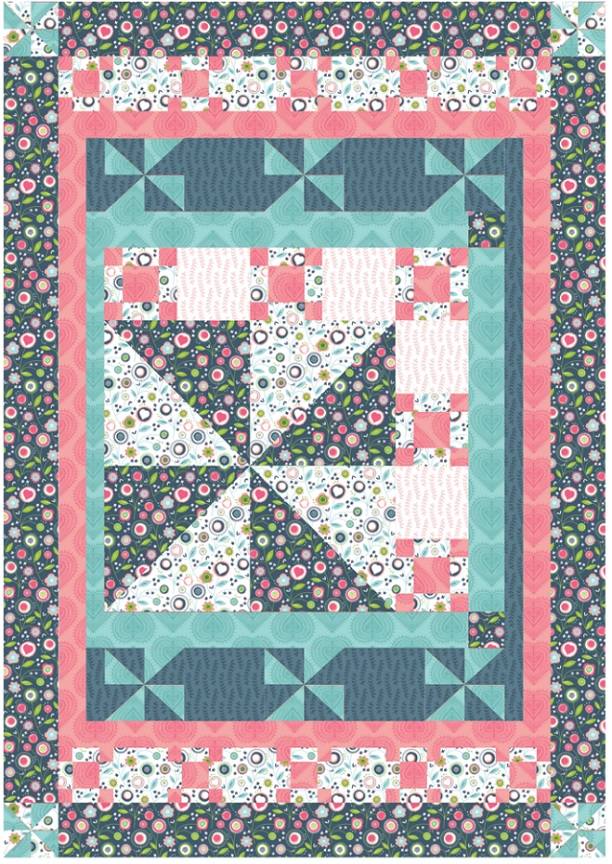
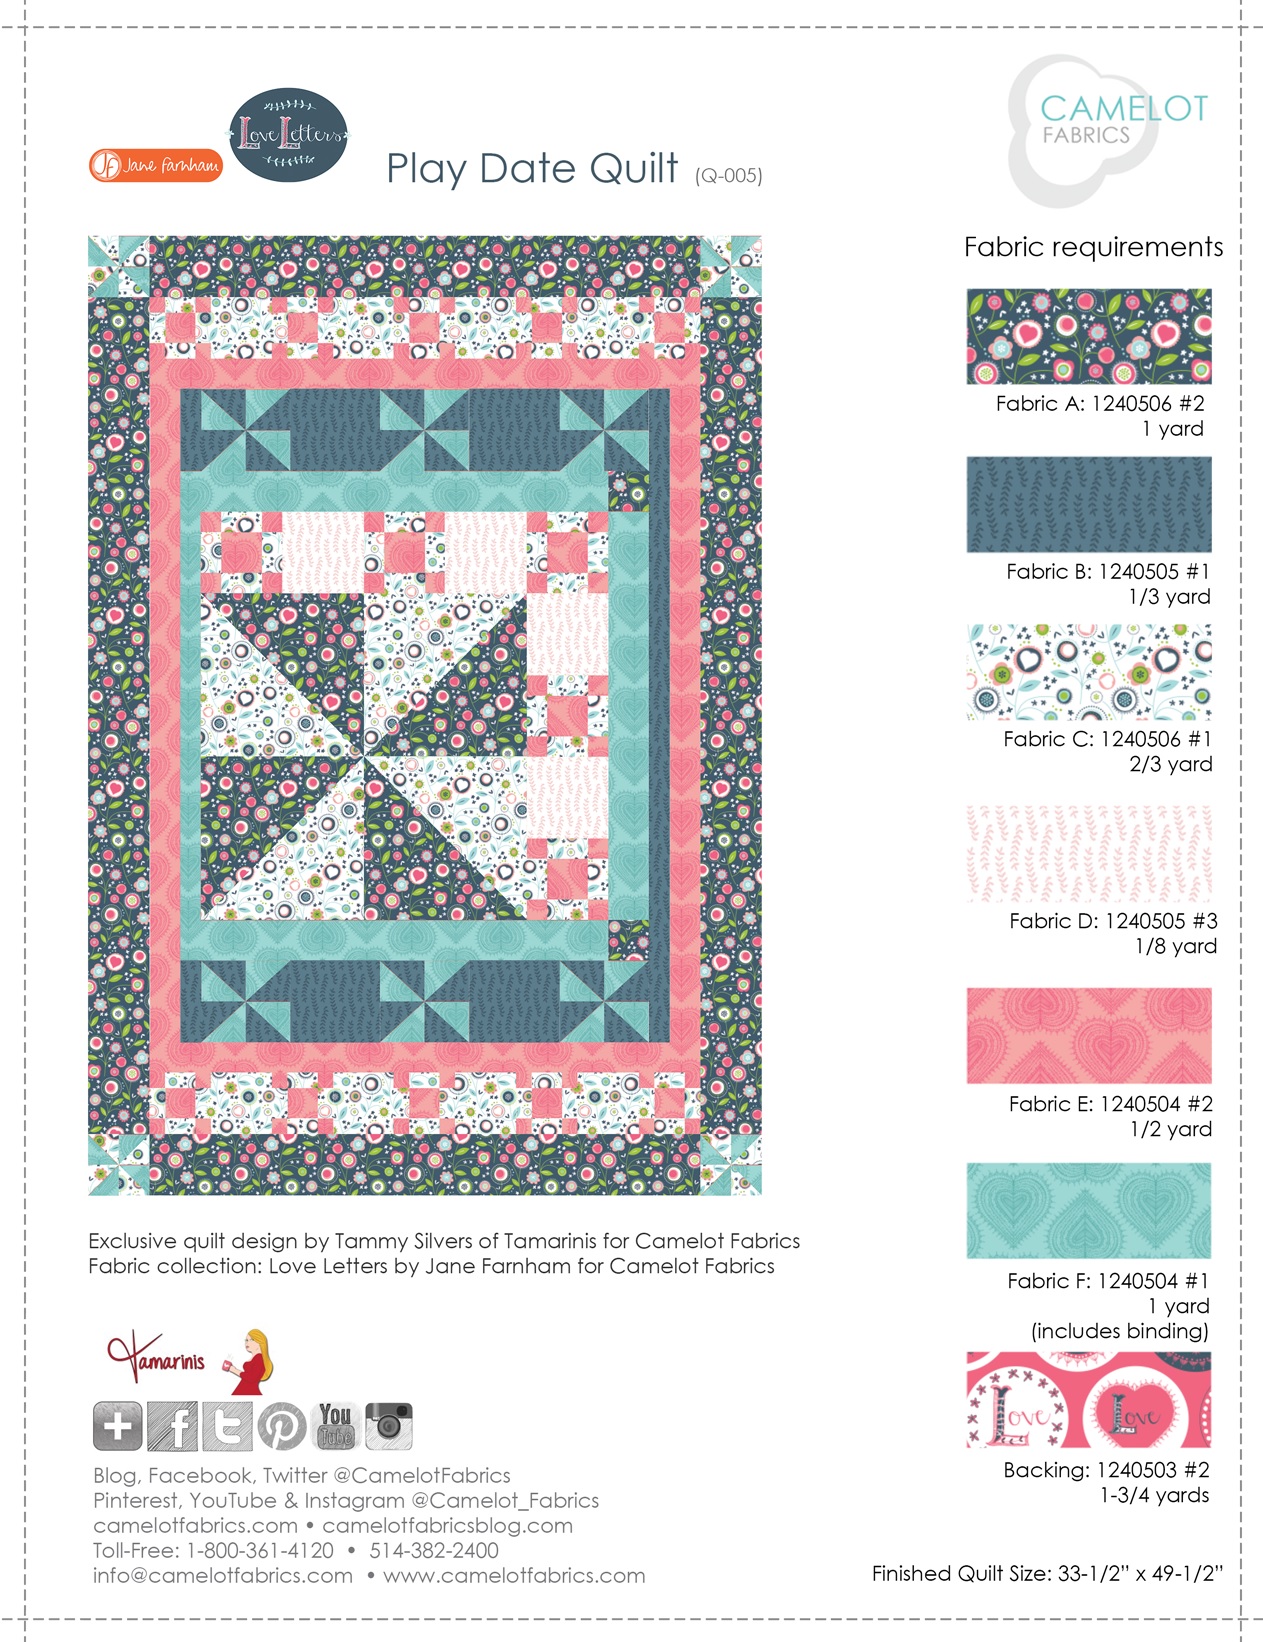
Time for this week’s How To’s Day! Today we are sharing our Play Date Quilt by Tamarinis tutorial with you. Play Date is a fun, lap-sized quilt that features a mix of windmills to create a unique pattern. This playful quilt is perfect for a newborn or little one to snuggle up with. Originally inspired by our Take Flight collection, Play Date also looks great with our With Love Collection – the whimsical floral and happy heart prints are perfect in this quilt design!
Want to create your own Play Date Quilt? Click MORE to see the full tutorial.
PLAY DATE QUILT
Pattern Designer: Tammy Silvers of Tamarinis
Fabric Featured: Love Letters by Jane Farnham for Camelot Fabrics
NOTES
• Use an accurate 1/4” seam allowance for all sewing.
• HST = Half Square Triangle. QST = Quarter Square Triangle.
• WOF = Width of Fabric.
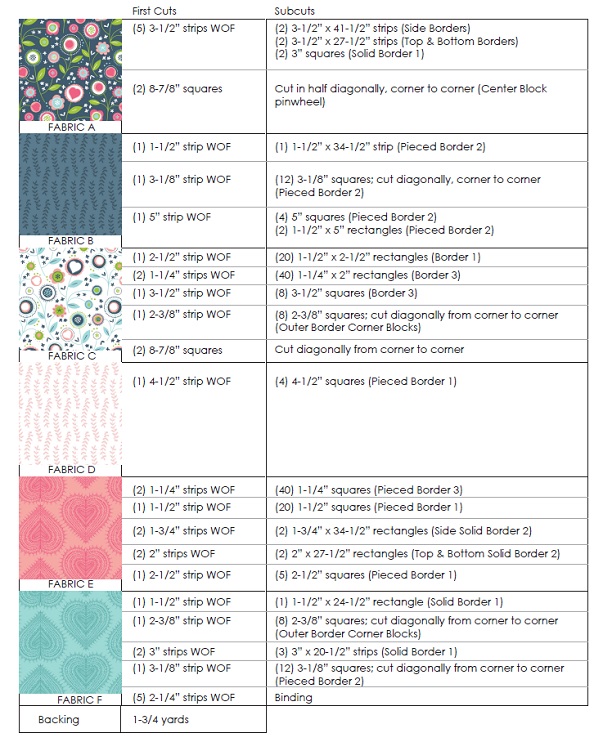
• Cut pieces for the quilt according to the chart on the first page.
CENTER BLOCK
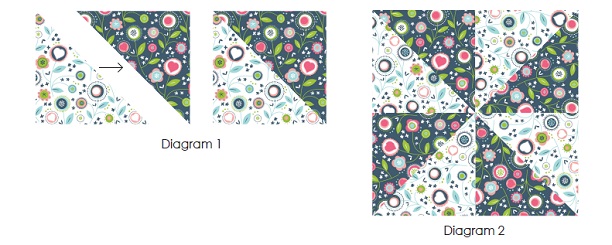
1. Sew (1) 8-7/8” Fabric A triangle to (1) 8-7/8” Fabric C triangle. Repeat to create (4) Fabric A/Fabric C HSTs (Diagram 1).
2. Sew the (4) HSTs created in Step 1 to create (1) 16” (finished) pinwheel block (Diagram 2).
PIECED BORDER 1
1. Sew (1) Fabric E 1-1/2” square to either side of (1) Fabric C 1-1/2” x 2 1/2” rectangle. Repeat with remaining Fabric E 1-1/2” squares and (10) Fabric C 1-1/2” x 2-1/2” rectangles to create (10) sets (Diagram 3A).
2. Sew (1) Fabric C 1-1/2” x 2-1/2” rectangle to either side of (1) Fabric E 2-1/2” square. Repeat with remaining Fabric C 1-1/2” x 2-1/2” rectangles and Fabric E 2-1/2” squares to create (5) sets (Diagram 3B).
3. Using Diagram 3 as a guide, sew (2) of the Fabric E/C/E sets created in Step 1 to (1) Fabric C/E/C set created in Step 2 to make an Uneven 9 Patch Block. Repeat to create (5) Uneven 9 Patch Blocks (Diagram 3C).
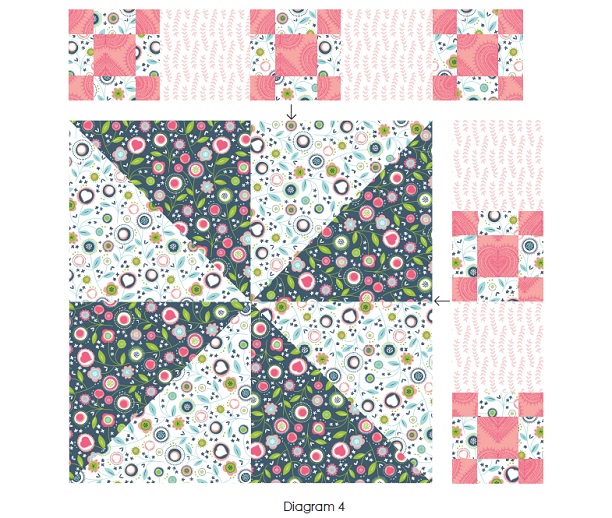
4. Using Diagram 4 as a guide, sew (2) Fabric D 4-1/2” squares to (3) Uneven 9 Patch blocks to create the top of the Pieced Border 1.
5. Using Diagram 4 as a guide, sew (2) Fabric D 4-1/2” squares to (2) Uneven 9 Patch blocks to create the side of the Pieced Border 1.
6. Sew the side Pieced Border 1 row (Step 5) on the right side of the center block.
7. Sew the top Pieced Border 1 row (Step 4) to the top of the center block (Diagram 4).
SOLID BORDER 1
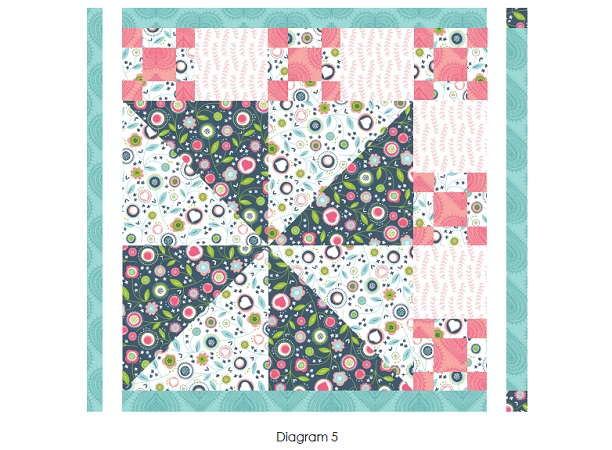
1. Sew (2) 3” Fabric F strips together. Subcut (3) 3” x 20-1/2” rectangles.
2. Sew (1) 3” x 20-1/2” Fabric F rectangle to each the top and the bottom of the quilt center (Diagram 5).
3. Sew (1) 3” Fabric A square to each the top and the bottom of the remaining 3” x 20-1/2” Fabric F rectangle (Diagram 5).
4. Sew the Fabric A/Fabric F/Fabric A strip to the right side of the quilt center (Diagram 5).
5. Sew the 1-1/2” x 24-1/2” Fabric F rectangle to the left side of the quilt center (Diagram 5).
PIECED BORDER 2
1. Sew (1) 3-1/8” Fabric F triangle to (1) 3-1/8” Fabric B triangle. Repeat to create (24) Fabric F/Fabric B HSTs (Diagram 6).
2. Sew the (24) HSTs created in Step 1 to create (6) 5” unfinished pinwheel blocks (Diagram 7).
3. Using Diagram 8 as a guide, sew (3) 5” unfinished pinwheel blocks and (2) 5” Fabric B squares together.
4. Sew (1) 1-1/2” x 5” Fabric B rectangles to the left side of the border strip (Diagram 8). Repeat to create (2) Pieced Border 2 strips.
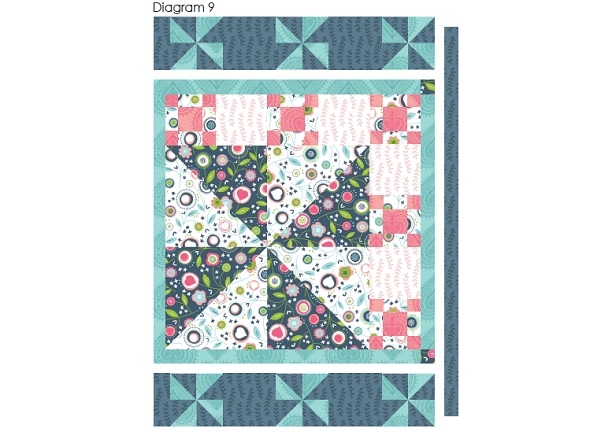
5. Sew a Pieced Border 2 strip to each the top and the bottom of the quilt center (Diagam 9).
6. Sew the Fabric B 1-1/2” x 34-1/2” rectangle to the right of the quilt center (Diagram 9).
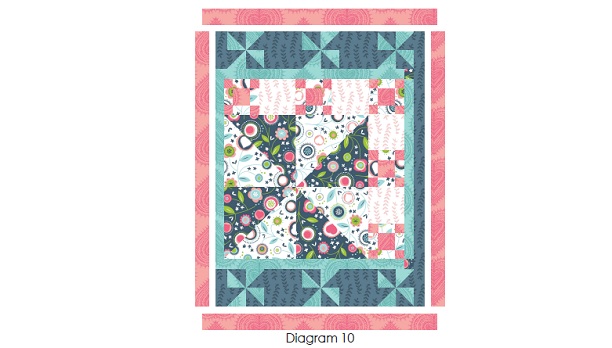
1. Sew (1) 1-3/4” x 34-1/2” Fabric E rectangle to each the left and the right side of the quilt center (Diagram 10).
2. Sew (1) 2” x 27-1/2” rectangle to each the top and the bottom of the quilt center (Diagram 10).
PIECED BORDER 2
1. Sew (1) Fabric E 1-1/4” square to either side of (1) Fabric C 1-1/4” x 2” rectangle. Repeat with remaining Fabric D 1-1/4” squares and (20) Fabric C 1-1/4” x 2” rectangles to create (20) sets (Diagram 11A).
2. Sew (1) Fabric C 1-1/4” x 2” rectangle to either side of (1) Fabric E 2” square. Repeat with remaining Fabric C 1-1/4” x 2” rectangles and Fabric E 2” squares to create (10) sets (Diagram 11B).
3. Using Diagram 11 as a guide, sew (2) of the Fabric E/C/E sets created in Step 1 to (1) Fabric C/E/C set created in Step 2 to make an Uneven 9 Patch Block. Repeat to create (10) Uneven 9 Patch Blocks (Diagram 11C).
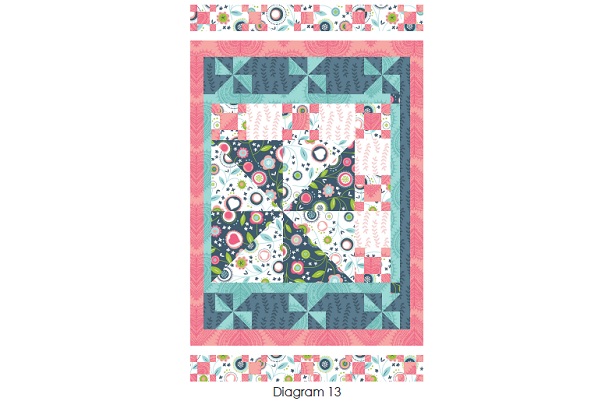
4. Using Diagram 12 as a guide, sew (5) Uneven 9 Patch Blocks and (4) Fabric C 3-1/2” squaresMtogether to create a Pieced Border 3. Repeat toMcreate the second Pieced Border 3.
5. Sew the Pieced Border 3 units created in steps 1 – 4 to the top and bottom of the quilt center (Diagram 13).
OUTER BORDER
1. Sew (1) 2-3/8” Fabric F triangle to (1) 2-3/8” Fabric C triangle. Repeat to create (16) Fabric F/Fabric C HSTs (Diagram 14).
2. Sew the (16) HSTs created in Step 1 to create (4)
3-1/2” unfinished pinwheel blocks (Diagram 15).
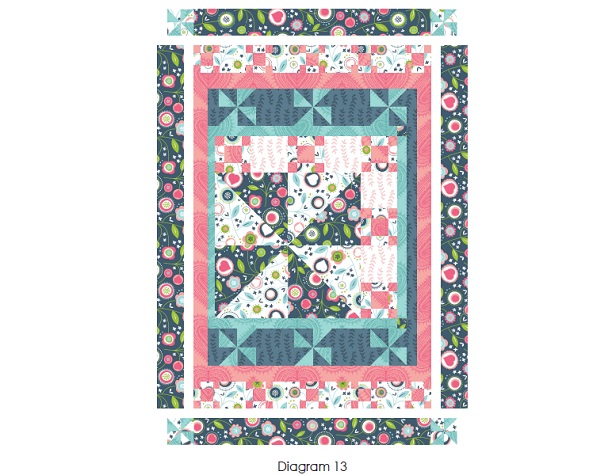
3. Sew a pinwheel block on either side of a Fabric A 3-1/2” x 27-1/2” rectangle to create the top and bottom borders (Diagram 16).
4. Sew a Fabric A 3-1/2” x 43-1/2” rectangle to each the left and the right side of the quilt (Diagram 16).
5. Sew the top and bottom borders created in Step 3 to the top and bottom of the quilt.
FINISHING THE QUILT
1. Center and lay the batting on top of the wrong side of the backing fabric.
2. Center and lay the pieced quilt top on top of the batting.
3. Pin or baste the quilt sandwich using your preferred method for securing the layers.
4. Quilt as desired.
5. Trim the edges of your quilt.
6. Use the Fabric F binding strips to bind the quilt.
Hope this was a fun one for you! Let us know if you decide to give Play Date a try, we’d love to see! You can always send your project photos to us by email or tag us Instagram. Have an amazing day!
Happy Sewing!
Comments are closed.
